Week 5 has been the second week in our first rapid ideation session, and the week in which I built my artefact (figure 1). As a quick recap, we were given a Dixit card with a surrealist image and asked to ideate a creative artefact from it.
My concept ideation and illustrator prototypes are all broken down in the first part of the blog here. In this entry, I'll focus on the development, which I completed in two days.
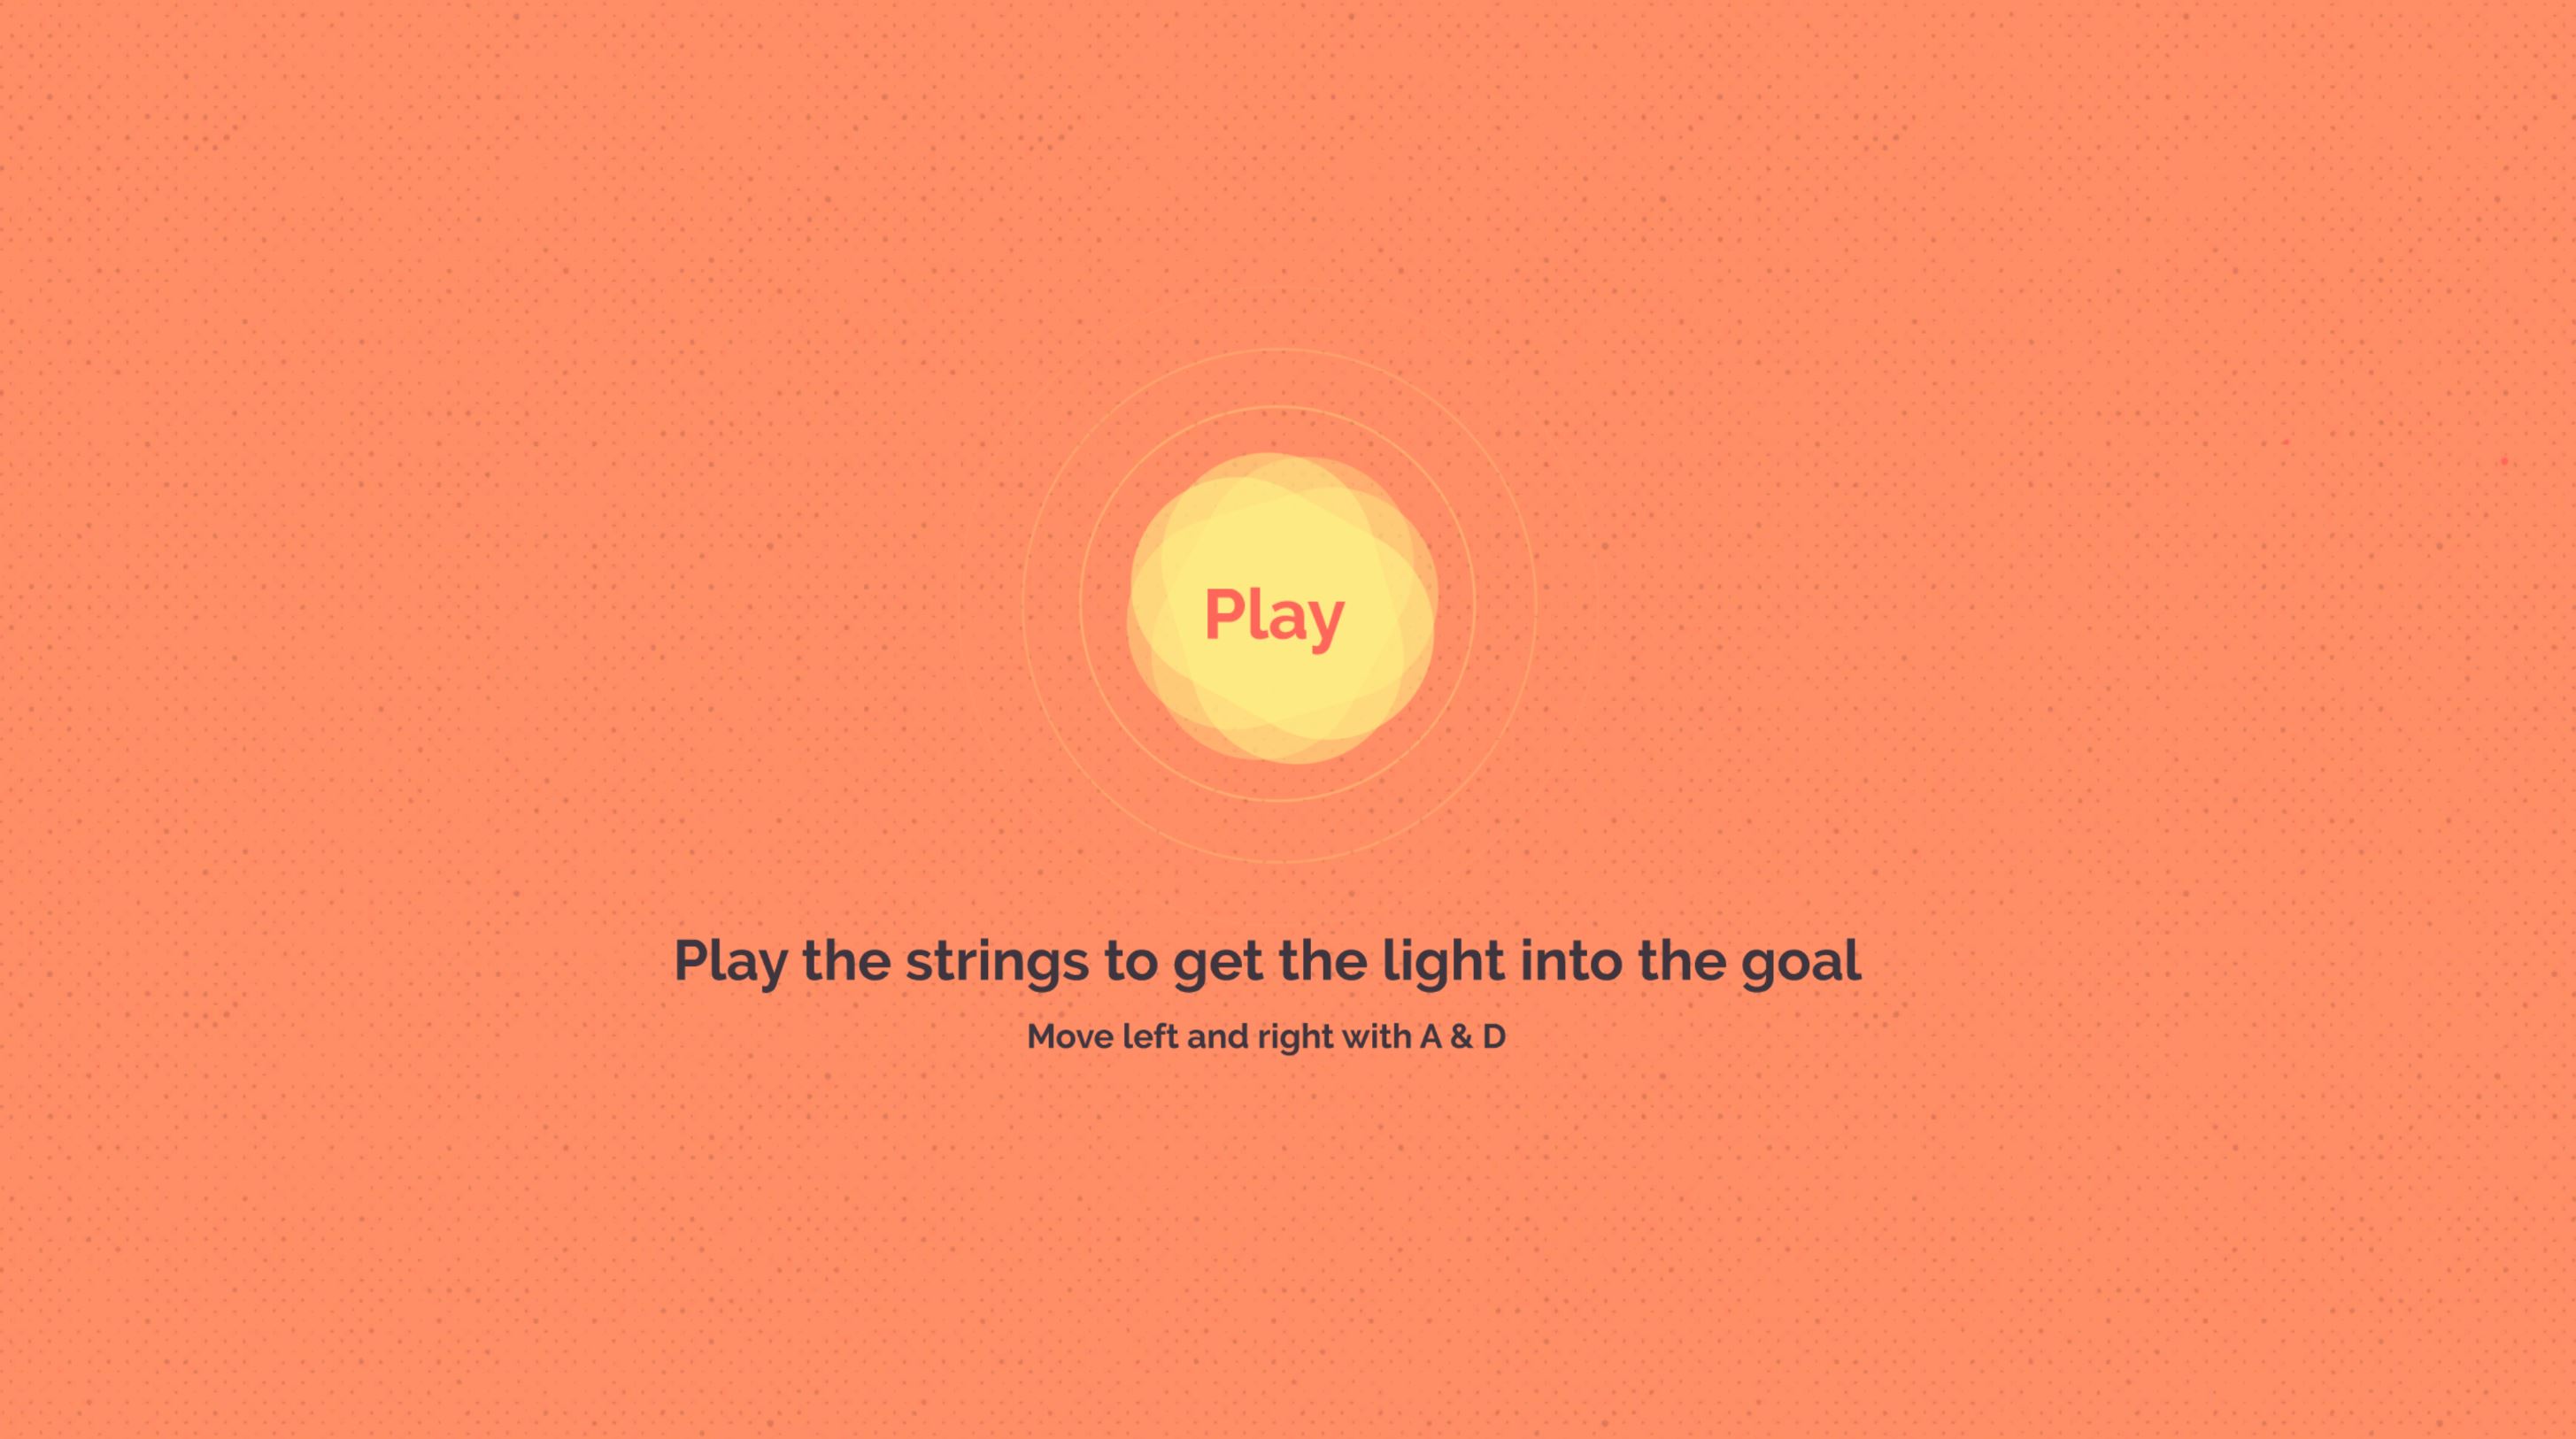
The artefact
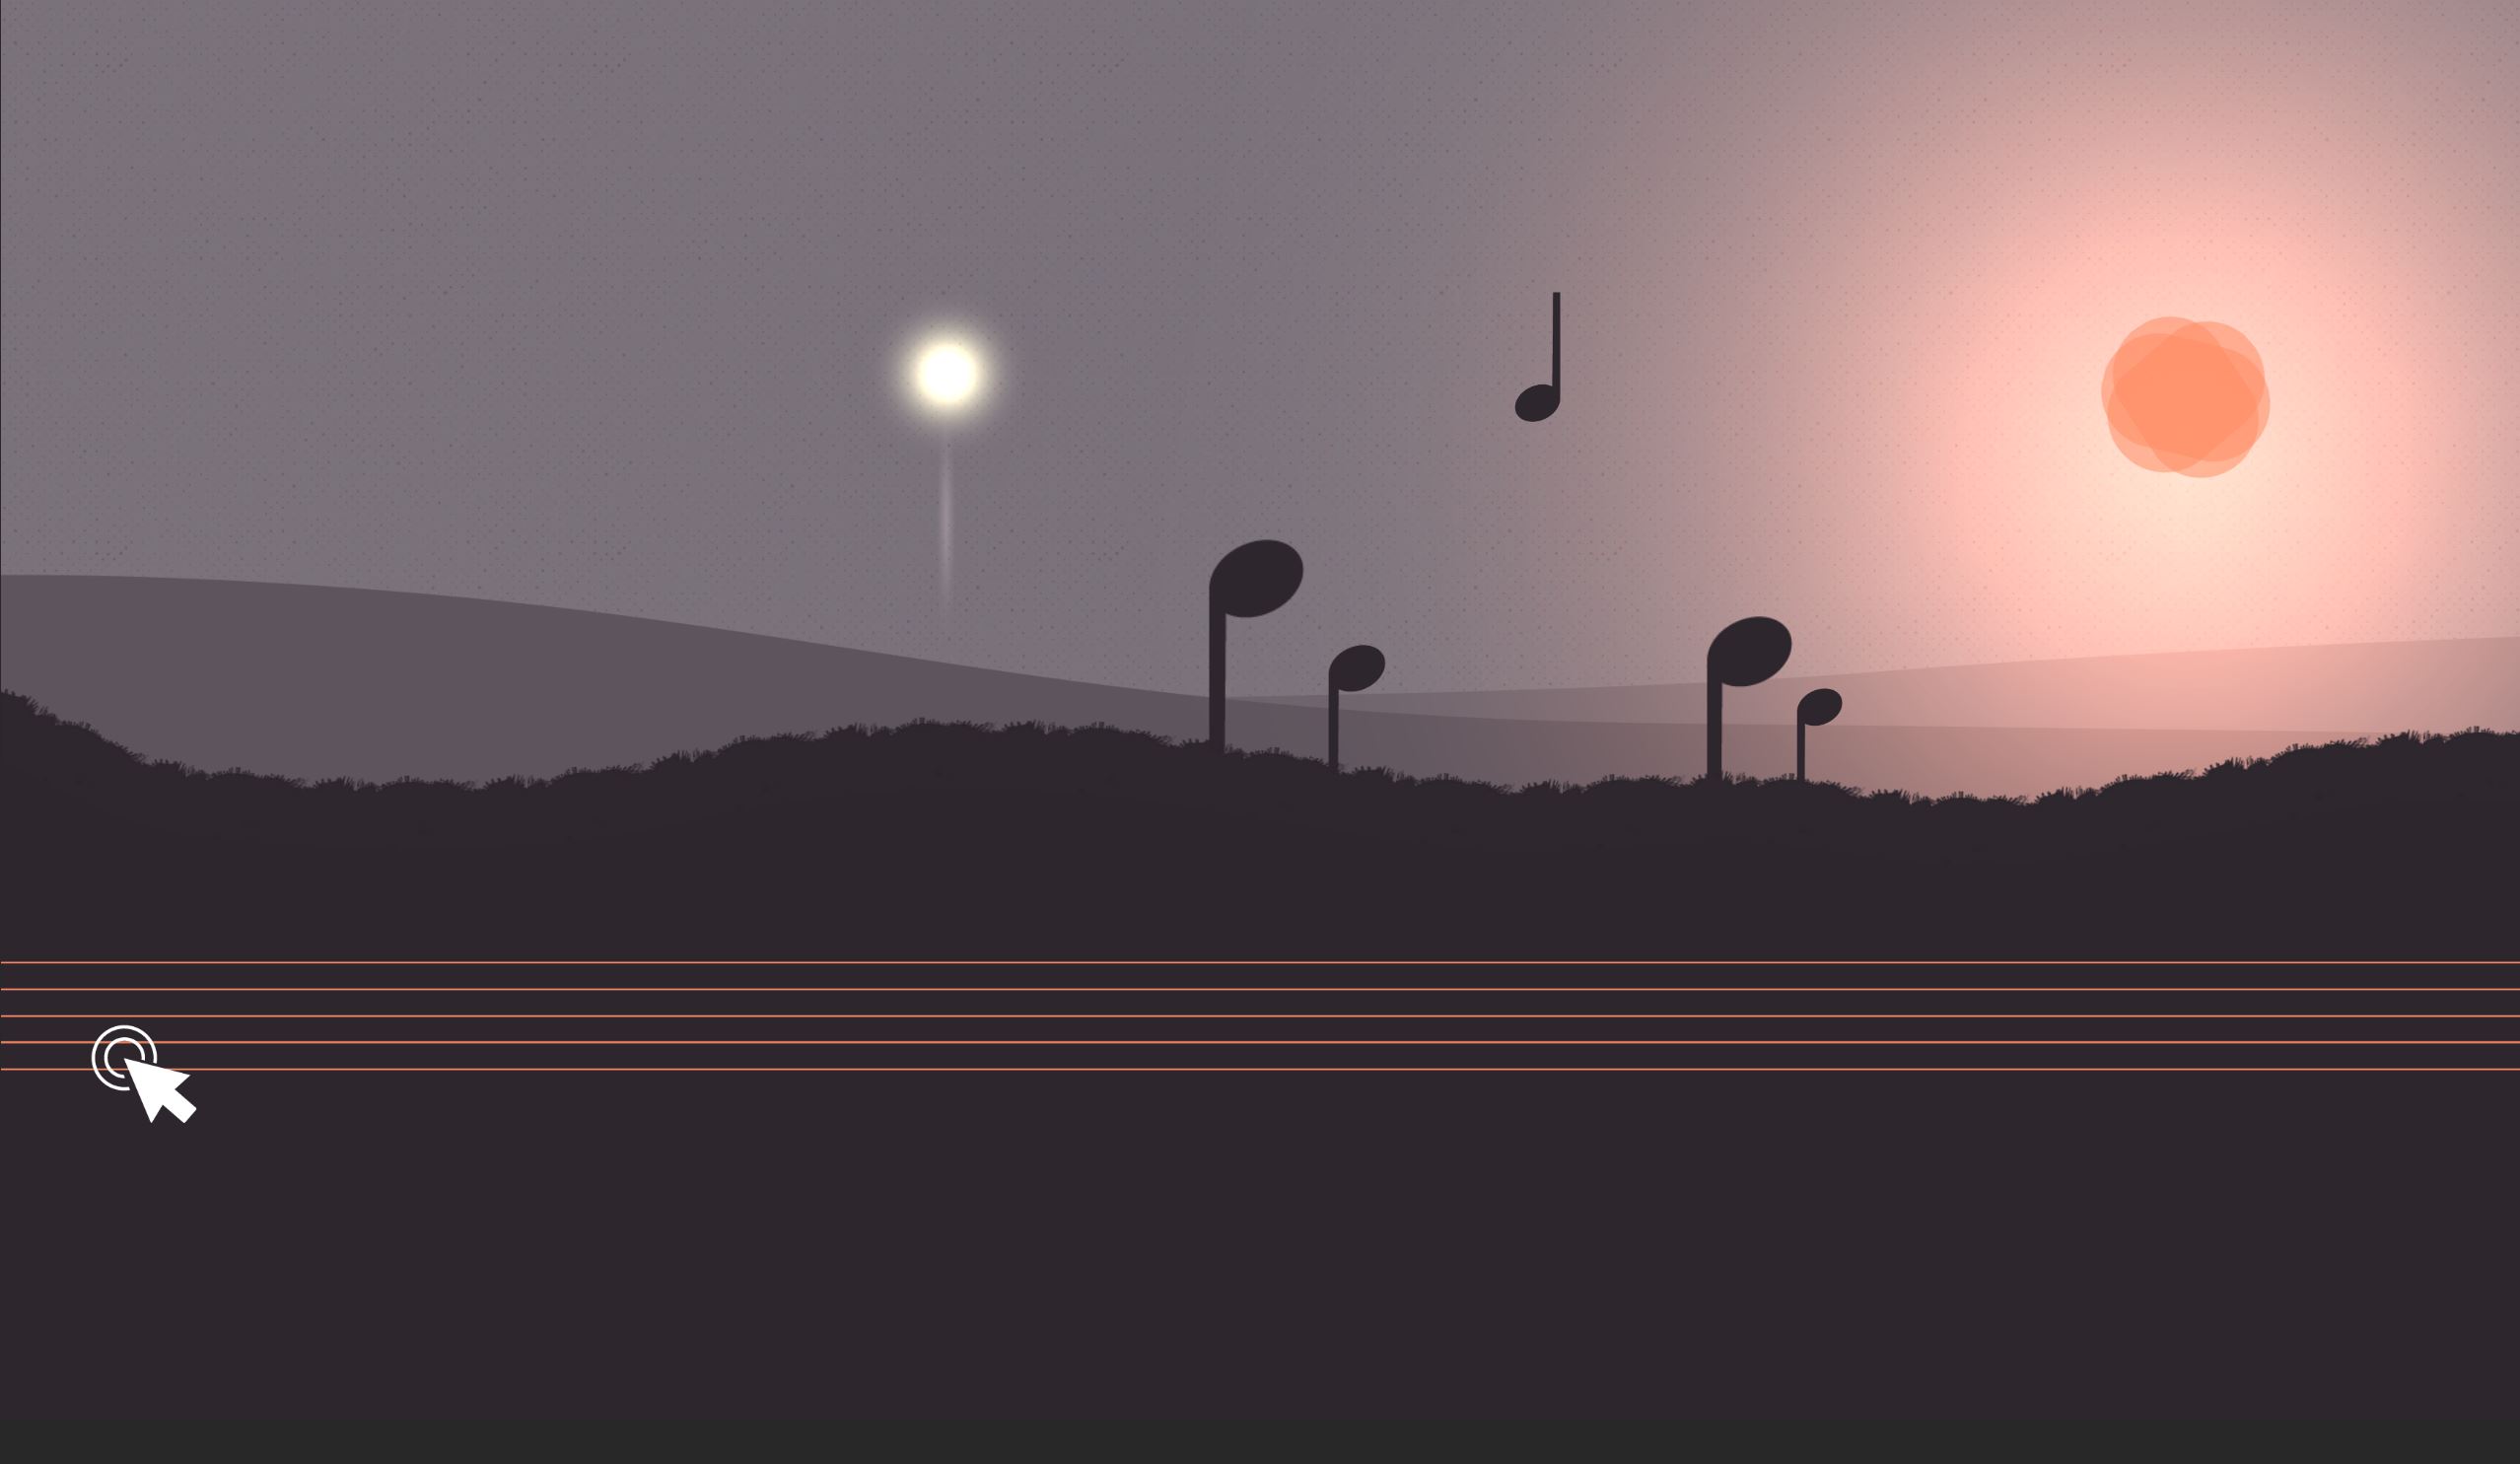
First up, here is the completed artefact (figure 2):
I chose to host it on itch.io as it's well equipped to upload Unity WebGL and handle all the server compression settings automatically.
Getting stuck in - Unity
A condition I set myself for this project was to develop something in Unity. I have some experience in Unity (enough for a Game Jam), but I have never built a game from scratch in it. I want to improve my workflow in Unity, so this is where I began.
Breaking it down - Tasks, time and management
I kicked off the process by setting out the core areas of development on my hacknPlan kanban board (figure 3). Breaking down each element using an agile process is crucial for rapid ideation. Without that focus, I find time quickly runs away. I then further broke down elements that I knew I'd need to develop to get a working prototype.
Time management was a bit of a challenge on this task. I wasn't able to begin development until two days before the show and tell and end of the session, meaning strict scheduling was required. Although I broke the tasks down, I didn't do enough scheduling around my moving and work commitments to make the best use of my time in this case.

The Ground Method
The biggest challenge in building this prototype was finding a way to manipulate the ground in a way that felt like the sound was really affecting it, and in turn that affected the playable object. If this mechanic didn't work, the concept would fall flat.
I wanted the ground to "pulsate" when the music is played, and push the ball up. This meant the ground needed some kind of dynamic control point.
Bezier Curves
A bezier curve is a useful and fundamental tool in most types of computer graphics. It's a parametric curve, which is used to make scalable curves based on the position of points (Patrikalakis et al, 2021). It's a handy way of manually drawing both simple and complex curves (think the pen tool in Photoshop), or to generate and manipulate them in real-time in gaming.
Below (figure 4) is an example of a quadratic curve that I generated using an online calculator (Desmos, 2021).
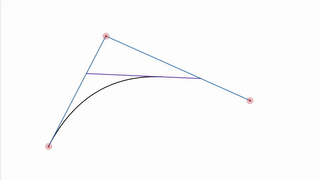
It's made of three points, which importantly for my artefact, can be manipulated. A Cubic Bezier curve is made of four points, and you can continue adding points to make more complex shapes.
So - why is this useful?
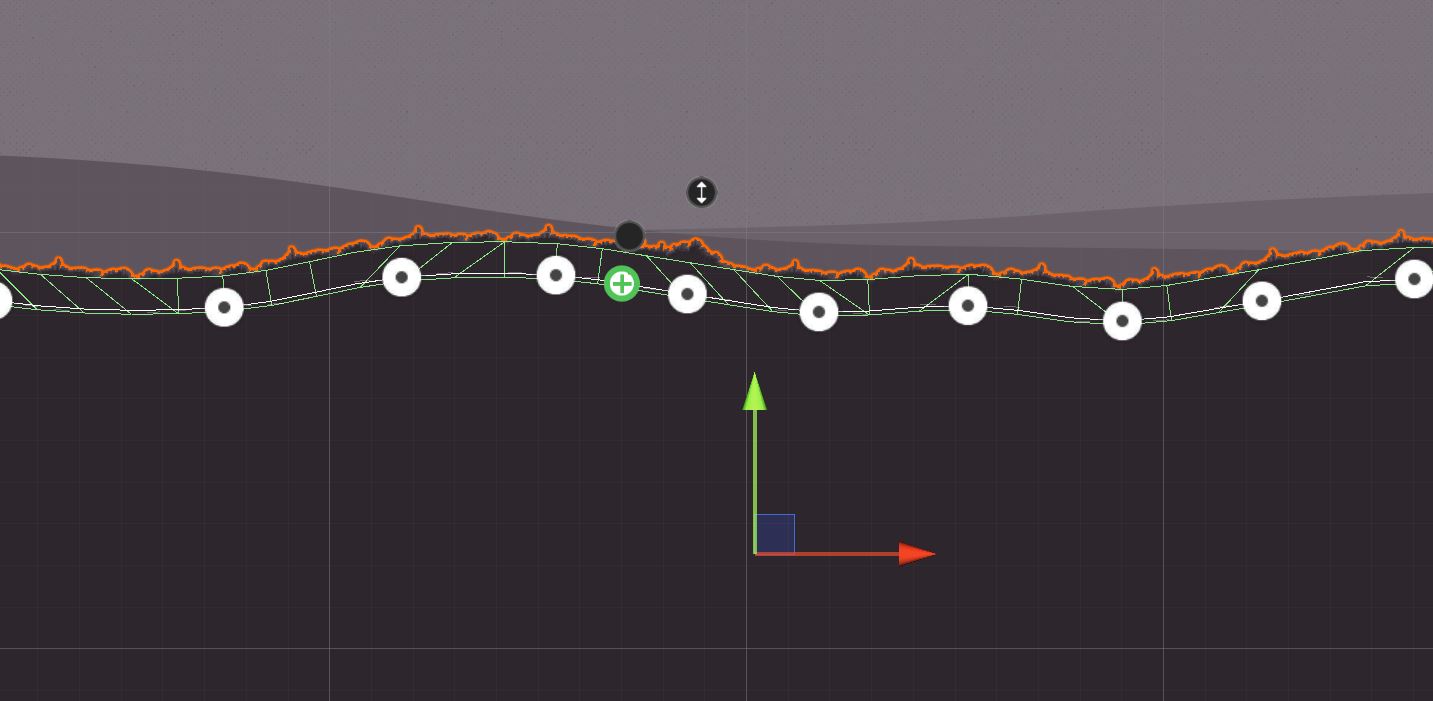
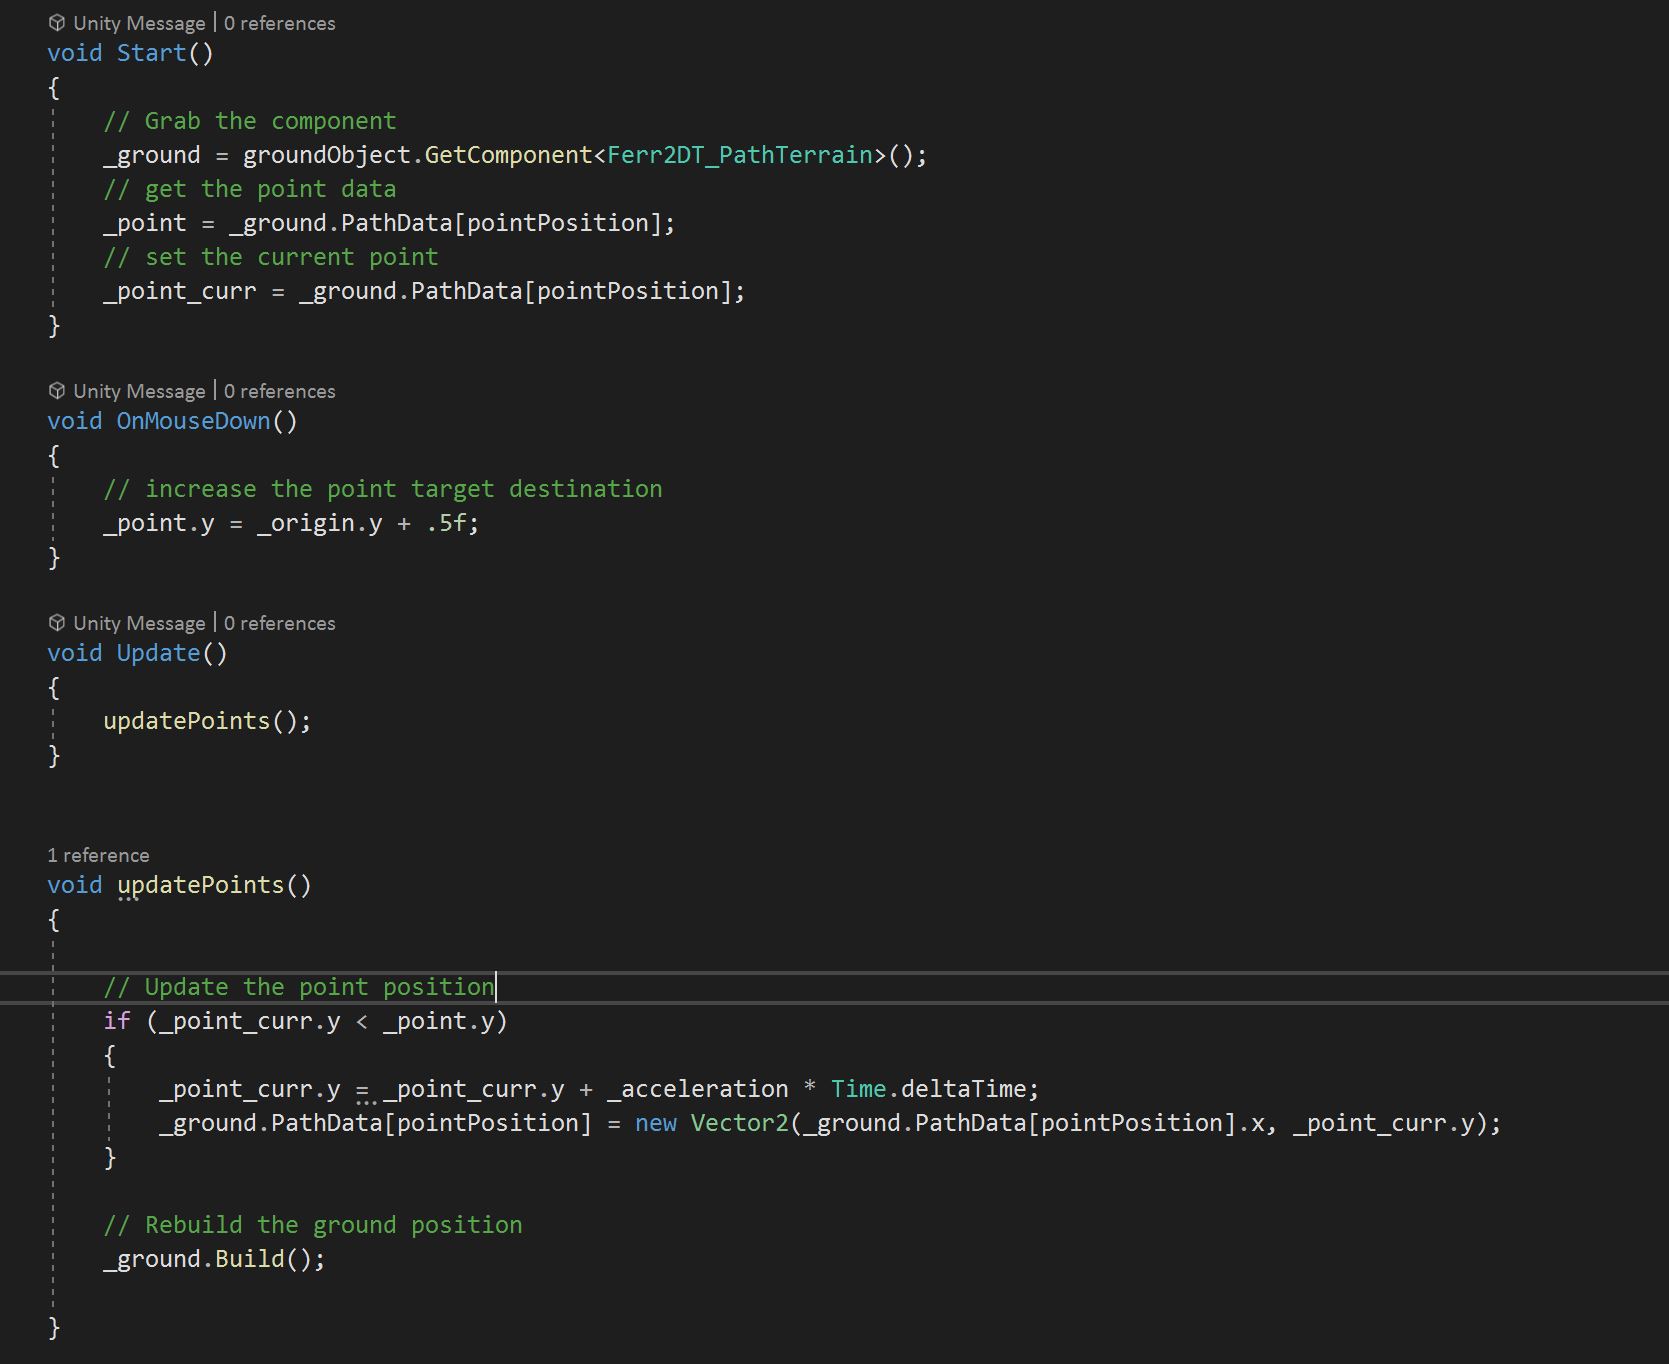
Being able to manipulate the points is the key to making a landscape that can bend and bounce in the way I needed it to. Given the time constraints, I found a really great package called Ferr2D (Ferr2D Terrain Tool, 2021) which allowed me to quickly draw up the curves and add textures, and crucially, access the control points through the component (figures 4 and 5).
Game Feel and Sound
Responsiveness and polish are really important for game feel. Game feel is that sweet spot where gameplay feels natural and satisfying and given my artefact relies on sound and impact to move, I spent some time refining this. As a quick recap, Game Feel is "the tactile, kinesthetic sense of manipulating a virtual object" (Swink, 2009).
Sound
I sourced a guitar scale and sliced it up in Adobe Audition. When the player hits the strings, the scale goes up and down depending on where they press. When they complete the level, the scale plays in full. After initial testing, this didn't feel quite enough, so I added a soundscape as a backing track and this binding the experience together better.
Camera
I tried a few things out with the camera. First I used a follow-cam focused on the player object, but this was quite overwhelming as the ground moved, the player bounced and the sounds played. It didn't feel right, so I changed to a static camera. However, something still felt a little flat.
So I looked into camera shakes and worked through a very useful tutorial (samyam, 2020) that helped me use Cinemachine's built-in camera shake features. With some tweaking, I was able to make a camera shake that made it feel like you were impacting the whole landscape by playing a sound. I'm really pleased with the outcome of this bit.
Animations and effects
Because the player is just a ball, the initial appearance wasn't great. It didn't appear to even roll. I used the animator component to add a little stretch on jumping, and the player immediately felt more reactive to input. I also added a trail component to give some visual impact from the player onto the landscape.
My first illustrator prototypes were flat with just a slight texture. Building on the theme of shadow, projections and forces, I added some lights to the scene and particle effects that trigger when completing. These all add to the feeling that the player is impacting the scene as they interact with it.
The Diversifier
Ah - The diversifier! I thought about this during my initial ideation, but it took a bit of a back seat as I developed and added things like UI and instructions (figure 7).
As a recap, my diversifier was:
Language-independence – create an artefact that can be understood regardless of which language the player speaks.
So instructions in English were not going to work. The gameplay itself doesn't require any language understanding, but I needed a better way to inform the player of the controls. I drew on my experience in experiential learning design here, and the idea of learning through doing, or playing. A key design principle is active experimentation (Bates, 2021), which is a natural match for gaming, so all we really need in this case are a few visual pointers.
I added arrows to the player object, which disappear on first use of the keys, and a constant mouse press icon to the guitar strings (figure 8):

Summing up
When I started this rapid ideation session, my only real goal was to produce something in Unity, and to try my very best to focus on the gameplay mechanic as a priority.
I'm happy with the artefact I created, but I definitely swayed a little wide of the mark in terms of focusing just on the gameplay mechanic. That said, through iteration, it became clear that this mechanic wouldn't work or be demonstrated well enough unless I put time into the game feel as well. So the biggest takeaway for me in this session was that game mechanics and game feel were very much intertwined even at the prototype stage and thought needs to be put into both at an early stage.
Furthermore, I'm very interested in whether or not this sensation of game feel could be directly linked to how quickly players learn how to play the game (or if it aids learning in serious games), which is an idea I want to research further on this course.
On the technical side, I've been able to spend a decent amount of time getting more familiar with Unity which has been hugely valuable and given me some clearer focus points in terms of what I'm finding challenging, and what I should focus on next.
Challenges and actions
My time management on this particular task wasn't as organised as it should have been. I had a lot going on with emigrating, changing dates and unexpected work tasks, and so the lack of blocked out time meant I really had to cram development into a short space of time at the end. If I'd dedicated a little more time to project management at the start, this would have been easier.
So for the next rapid ideation session (which starts the week I am travelling, so a similar challenge), project management, and specifically time blocking, will be a good course of action.
Another challenge was my Unity workflow as I get to grips with the engine. I made some good progress, but I'd like to explore ways to improve here. As preparation for the next session, I'm going to research some tutorials on Unity workflow and start making notes of what it and isn't efficient in my project setup.
So a few goals I've set after this exercise are:
- Refine my workflow in Unity to speed up production.
- Study like I work - integrate proper project management consistently.
- Look at developing methods for integrating game feel ideas into an early prototype.
- Research experiential learning for gameplay tutorials further.
List of Figures
Figure 1. Vestby-Clarke, S., 2021. Rapid ideation game [image] Available at: <http://indie.samvestbyclarke.com/bl-content/uploads/pages/11525c64e41486218d59bcf71408a1d5/week-4-result_0.jpg> [Accessed 5 July 2021].
Figure 2. Vestby-Clarke, S., 2021. Rapid ideation game - click to play. [image] Available at: <http://indie.samvestbyclarke.com/bl-content/uploads/pages/11525c64e41486218d59bcf71408a1d5/week-4-result_0.jpg> [Accessed 5 July 2021].
Figure 3. Vestby-Clarke, S., 2021. My Hacknplan kanban board. [image] Available at: <http://indie.samvestbyclarke.com/bl-content/uploads/pages/11525c64e41486218d59bcf71408a1d5/kanban-new.jpg> [Accessed 5 July 2021].
Figure 4. Vestby-Clarke, S., 2021. Bezier curves in motion. [image] Available at: <http://indie.samvestbyclarke.com/bl-content/uploads/pages/11525c64e41486218d59bcf71408a1d5/beziercurve.gif> [Accessed 5 July 2021].
Figure 5. Vestby-Clarke, S., 2021. I used Ferr2D to quickly draw up bezier curve created landscapes. [image] Available at: <http://indie.samvestbyclarke.com/bl-content/uploads/pages/11525c64e41486218d59bcf71408a1d5/bezierpointsingame.jpg> [Accessed 5 July 2021].
Figure 6. Vestby-Clarke, S., 2021. The code for manipulating the landscape bezier curve control points accessed through a component. [image] Available at: <http://indie.samvestbyclarke.com/bl-content/uploads/pages/11525c64e41486218d59bcf71408a1d5/manipulate-points.jpg> [Accessed 5 July 2021].
Figure 7. Vestby-Clarke, S., 2021. My first play screen didn't hit the diversifier brief. [image] Available at: <http://indie.samvestbyclarke.com/bl-content/uploads/pages/11525c64e41486218d59bcf71408a1d5/text-intro.jpg> [Accessed 5 July 2021].
Figure 8. Vestby-Clarke, S., 2021. New help/tutorial visuals added to replace text instructions. [image] Available at: <http://indie.samvestbyclarke.com/bl-content/uploads/pages/11525c64e41486218d59bcf71408a1d5/week-4.jpg> [Accessed 5 July 2021].
References
Bates, A., 2021. 3.6 Experiential learning: learning by doing (2). [online] Teaching in a Digital Age. Available at: <https://opentextbc.ca/teachinginadigitalage/chapter/4-4-models-for-teaching-by-doing/> [Accessed 5 July 2021].
Desmos. 2021. Bezier Curves - Quadratic & Cubic. [online] Available at: <https://www.desmos.com/calculator/lvdgnyhkvy> [Accessed 5 July 2021].
2019. Ferr2D Terrain Tool. Charlotte, NC: Simbryo.
Patrikalakis et al, N., 2021. Shape Interrogation for Computer Aided Design and Manufacturing (Hyperbook Edition). [online] Web.mit.edu. Available at: <https://web.mit.edu/hyperbook/Patrikalakis-Maekawa-Cho/> [Accessed 5 July 2021].
samyam, 2020. Cinemachine's Built-In Screen Shake - Unity 2020 Tutorial. [video] Available at: <https://www.youtube.com/watch?v=8XZqopmI6AI> [Accessed 5 July 2021].
Swink, S., 2009. Game Feel: A Game Designer's Guide to Virtual Sensation. 1st ed. Elsevier.